First, you create a part to use as a component in an assembly.
-
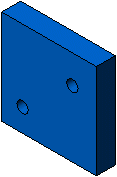
Create a new part that is a 100mm x 100mm x 20mm block.
For instructions on creating a part, see the tutorial Lesson 1 - Parts.
-
Use the Hole Wizard
 (Features tab) to create two holes with the following parameters:
- Hole Type - Hole

- Standard - ISO
- Type - Drill sizes
- Size - Ø12.0
- End Condition - Through All
- Options - Accept
the defaults.
-
Click the Positions tab,
select points on the block for the hole locations, and click
 .
.
The location of the holes does not
need to exactly match the image below.
-
Click .
-
In the dialog box, browse to a local folder, for File
name enter block.SLDPRT, then click
Save and close the part.