Now adjust the bend notes for clarity by hiding, moving, and adding leaders to selected notes.
-
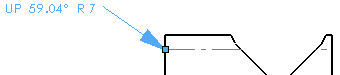
Press Ctrl and select UP 59.04° R7 and DOWN 90.00° R1 from the miter flange located at the bottom, as shown.
- Right-click and select Hide.
- Repeat steps 1 and 2 with the miter flange bend line notes at the top, as shown.
- Select UP 59.04° R7 from the miter flange located at the top and drag outside the part's shape to the left.
-
In the PropertyManager, under Leader, click Leader
 .
.
You can change the angle of a bend note, the leader type,
and the arrow style.
- Repeat steps 4 and 5 with the three remaining miter flange notes.
-
Click
 to close the
PropertyManager.
to close the
PropertyManager.
- Press Ctrl and select the five vertical instances of UP 90.00° R1 and DOWN 90.00° R1 along the center of the drawing.
- In the PropertyManager, under Text Format, set Angle
 to 0.
to 0.
- Click to place the bend notes so the drawing view approximately resembles the image below.
-
Click .
Congratulations! You have completed this tutorial.