Parts List and Edit Parts List Dialog Boxes
This dialog box lets you modify the layout of the parts list and change the appearance of the parts list data.
The dialog box appears when you use the AM_PartList command.
Parts List Dialog Box Elements
Dialog Box Toolbar
You can use the following toolbar buttons:
| Function |
Icon |
Description |
| Zoom to |
 |
Zooms to the part associated with the selected row of the parts list.
The Parts List dialog box closes temporarily.
If the selected row is associated with several instances of the element, you can use the Next item option to step through each instance one by one. To return to the Parts List dialog box, use the Exit option. The program restores the original view of the graphics area. |
| Highlight |
 |
Highlights the geometry associated with the selected row of the parts list.
The Parts List dialog box closes temporarily.
If the selected row is associated with several instances of the element, you can use the Next item option to step through each instance one by one. To return to the Parts List dialog box, use the Exit option. The program restores the original view of the graphics area. |
| Insert column left |
 |
Inserts a column to the left of the column that is currently selected. Opens the Select Columns dialog box where you can add columns that are not yet included in the Parts List. |
| Insert column right |
 |
Inserts a column to the right of the column that is currently selected. Opens the Select Columns dialog box where you can add columns that are not yet included in the Parts List. |
| Remove column |
 |
Removes the selected column from the Parts List. |
| Merge rows |
 |
Merges two or more selected rows into one row. |
| Split rows |
 |
Splits a merged row. |
| Sort |
 |
Displays the Sort dialog box, where you can specify options to sort the Part List.
See Sort Dialog Box. |
| Remove overrides |
 |
Removes overrides from the current selection and restores their default values. |
Layout Settings
You can define the layout of the parts list:
| Function |
Description |
| Parts list name |
Lets you to enter the name of the parts list which appears on the title bar of the parts list in the graphics area. |
| Insertion point |
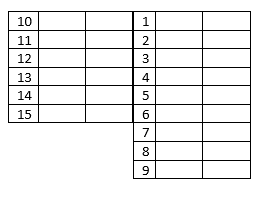
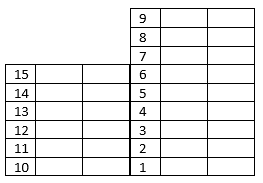
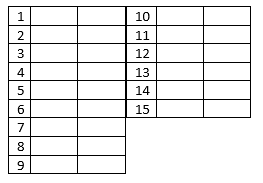
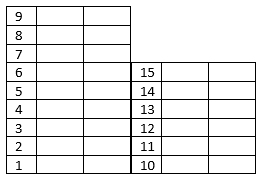
Sets the placement of the parts list insertion point and where the parts list title appears (top left, top right, bottom left, or bottom right). If the insertion point is at the bottom, the header and title appear at the bottom of the parts list and the parts are listed from bottom to top. If the insertion point is at the top, the header and title appear at the top of the parts list and the parts are listed from top to bottom. |
| Insert header |
Determines whether a header row appears in the parts list. The header displays the column headers of the parts list. |
| Insert title |
Determines whether a title bar appears in the parts list. The title bar shows the name of the parts list. |
| Show grip frame |
Determines whether the grip frame of the parts list appears. The grip frame is a frame that displays the extent of the parts list, which, might be larger than the visible extent of the parts list. The grip frame lets you visualize the effect of parts list splitting by dragging. |
| Line spacing |
Determines whether single, double or triple text lines are to be used in the rows of the parts list. |
Parts List Contents
Various columns are available in the Parts List Contents list, depending on the properties of the part references that were specified in the graphics area.
Part list split
Groups options to wrap the parts list as the number of data rows grows.
| Option |
Description |
| Enable split |
Toggle part list splitting |
| Wrap left |
Wraps the parts list to the left. The position of the first item of the list is according to the insertion point.
  |
| Wrap right |
Wraps the parts list to the right. The position of the first item of the list is according to the insertion point.
  |
| Number of rows |
Splits the parts list after the number of rows exceeds the specified number of rows |
| Number of sections |
Splits the parts list into the specified number of sections |
Settings
Displays the Parts List Settings dialog box.
Sort Dialog Box
The Sort dialog box lets you specify options to sort the Part List.
Key 1, Key 2, Key 3
Lets you specify up to three sort criteria. You can modify the sorting order separately for each column. Key 1 refers to the primary sort column.
Part List rows are first sorted by the first rule. Rows with identical values according to the first sort rule are then sorted according to the second one.
Ascending
Arranges the list from the lowest value to the highest.
Descending
Arranges the list from the highest value to the lowest.
Parts List Settings Dialog Box
This dialog box lets you specify setting for all parts lists from the drawing.
Standard
Displays the name and the revision of the current standard.
Insertion
Insertion point
Sets the placement of the parts list insertion point and where the parts list title appears (top left, top right, bottom left, or bottom right). If the insertion point is at the bottom, the header and title appear at the bottom of the parts list and the parts are listed from bottom to top. If the insertion point is at the top, the header and title appear at the top of the parts list and the parts are listed from top to bottom.
Text
Groups the text settings for parts list heading and data rows.
Header
| Option |
Description |
| Style |
Text style to use for the heading row |
| Height |
Text height to use for the heading row |
| Control |
Controls how the text fits within the column width.
- Fit. Compresses the text to fit within one line.
- Wrap. Wraps the text to the next line.
- None. The text flows to the next column.
|
| Color |
Text color to use for the heading row |
Data
| Option |
Description |
| Style |
Text style to use for the data rows |
| Height |
Text height to use for the data rows |
| Spacing |
The gap between two data rows |
| Control |
Controls how the text fits within the column width.
- Fit. Compresses the text to fit within one line.
- Wrap. Wraps the text to the next line.
- None. The text flows to the next column.
|
| Color |
Text color to use for the data rows |
Internal Margins
Specifies the space between the text and the edge of the heading row cells.
Header
| Option |
Description |
| Top |
The distance from the top border of the header row to the top edge of the text |
| Bottom |
The distance from the bottom border of the header row to the bottom edge of the text |
| Left |
The distance from the left border of the header row to the left edge of the left aligned text |
| Right |
The distance from the right border of the header row to the right edge of the right aligned text |
Data
| Option |
Description |
| Top |
The distance from the top border of the data row to the top edge of the text |
| Bottom |
The distance from the bottom border of the data row to the bottom edge of the text |
| Left |
The distance from the left border of the data row to the left edge of the left aligned text |
| Right |
The distance from the right border of the data row to the right edge of the right aligned text |
Layout
| Option |
Description |
| Insert header |
Determines whether a header row appears in the parts list. The header displays the column headers of the parts list. |
| Insert title |
Determines whether the parts list has a title. The title displays the name of the parts list. |
| Show grip frame |
Determines whether the grip frame of the parts list appears. The grip frame displays the extent of the parts list, which, might be larger than the visible extent of the parts list. The grip frame lets you visualize the effect of parts list splitting by dragging. |
| Bold style |
Sets the line style on title, header and summation rows to bold. |
Part list splitting
Groups options to wrap the parts list as the number of data rows grows.
| Option |
Description |
| Enable column splitting |
Toggle part list splitting |
| Wrap left |
Wraps the parts list to the left. The position of the first item of the list is according to the insertion point.
|
| Wrap right |
Wraps the parts list to the right. The position of the first item of the list is according to the insertion point.
|
| Number of rows |
Splits the parts list after the number of rows exceeds the specified number of rows |
| Number of sections |
Splits the parts list into the specified number of sections |
Restore Defaults
Restores all settings to the default values.