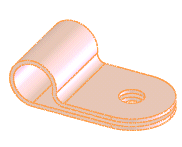
Cable Clips
|
Cable clips and other similar hardware (cable clamps, tie wraps, brackets,
and so on) are often used to restrain electrical cables or flexible tubes
at selected points along their route.
You can:
Place clips in the route sub-assembly, and the
software automatically routes a spline through the clips. Place clips in the main assembly, then automatically
route a spline through them in the route sub-assembly. Create multiple configurations of a clip in different
sizes, so that the clip automatically resizes to the appropriate configuration
when the cable diameter changes. Move a clip after you create a route through it.
The route updates to match the new location of the clip. Rotate
clips while or after you place them in an assembly. Align an
axis of a clip with an edge or axis in the assembly. Use virtual
clips, which do not require any solid geometry, to position a route. |
|
 You can also
use cable clips when you create an Orthogonal
route for pipes in the Auto Route PropertyManager.
You can also
use cable clips when you create an Orthogonal
route for pipes in the Auto Route PropertyManager.
Requirements
To use the Automatically
route on drop of clips Routing option, cable clips are required
to have the following:
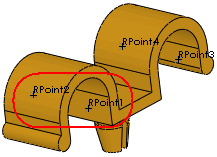
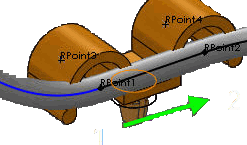
Two Route Points.
The route points identify the part as a clip component, and they define
the entry/exit points for auto-routing.
An axis between
the two Route Points. The axis defines the route centerline for
clips that you have pre-placed in the assembly.
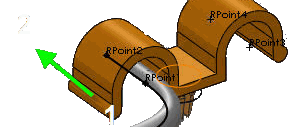
 The route is created along
the axis between RPoint1 and RPoint2 when you drag the clip to a routing
assembly. Consequently, take care to define the first two route points
according to routing design intent if your clip includes more than two
route points.
The route is created along
the axis between RPoint1 and RPoint2 when you drag the clip to a routing
assembly. Consequently, take care to define the first two route points
according to routing design intent if your clip includes more than two
route points.
|
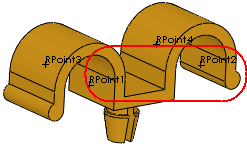
Cable Clips with Multiple Route Points |
Resulting Routes |
|
|
|
|
|
|
In addition, to facilitate orienting
clips, you can add:
An axis
named Axis of Rotation, about
which you can rotate the clip while or after you place it in the assembly.
An axis
named Clip Axis to align with
an edge or axis in the assembly. For example, you can rename the axis
between the two route points Clip Axis.
In addition, if you want the
clip to automatically resize when the cable diameter changes, you need:
Overlapping Configurations.
Using a design table, create multiple configurations of the clip in different
sizes, with varying values for the filter data. The InnerDiameter
of one size must be less than the OuterDiameter
of the next size down, so that the complete set of configurations covers
the whole range of sizes from largest to smallest with no gaps.

For procedures on working with
clips, see: