Face Identification PropertyManager
You create sub-meshes that you later extract as analytic or non-analytic
surfaces.
The goal is to separate areas of specific design intent, for example:
areas that are planes, cylinders, cones, b-surfaces, etc. Each specific
area must be its own sub-mesh, as indicated by the different colors. You
then refine the design intent using paint tools to split sub-meshes or
join separate sub-meshes. Areas designed for b-surfaces require more attention
to remove inappropriate curvature and jagged edges.
Automatic Painting
Select sub-mesh
to decompose. Activates Automatic
Painting for the selected sub-mesh.
Sensitivity.
Dynamically updates the preview of the selected sub-mesh when you move
the slider. When you first open the PropertyManager, the entire model
is pre-selected, so Sensitivity
affects all sub-meshes. This is the only time that all sub-meshes are
group selected, so be sure you have adjusted Sensitivity
as desired before you click Apply.
Sensitivity sets the maximum angle of incidence permitted between
triangles, measures the angles, then joins or separates triangles based
on the setting.
Apply.
Creates sub-meshes based on the Sensitivity
setting and the graphics area display.
Cancel.
Cancels Automatic Painting and
clears the selected sub-mesh.
Manual Painting
(Available when no sub-meshes are selected for Select
sub-mesh to decompose under Automatic
Painting.)
Paint color
Paint tools
To identify faces and create sub-meshes:
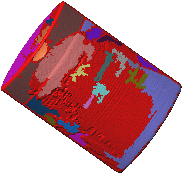
When the Face
Identification PropertyManager opens, the entire mesh is pre-selected
and decomposed into sub-meshes, which are indicated by different colors.
The sub-meshes are not yet created.
In this example, you want the face shown
to extract as one cylindrical surface, so you want one sub-mesh for it
instead of the multiple sub-meshes shown.
Under Automatic
Painting, move the Sensitivity
slider to achieve the design intent as much as possible.
 To skip Automatic
Painting and go straight to Manual
Painting, click Cancel
under Automatic Painting, then
use the Paint tools under Manual Painting.
To skip Automatic
Painting and go straight to Manual
Painting, click Cancel
under Automatic Painting, then
use the Paint tools under Manual Painting.
In this example, you move the slider to the
right to increase sensitivity, resulting in one sub-mesh for the face.
Note that the top section is also now one individual sub-mesh.
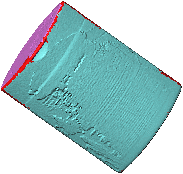
Inspect the entire model to verify design intent.
In this example, when you view the other
side of the mesh, there are multiple sub-meshes, including a sub-mesh
joined to the blue colored sub-mesh on this side. You want two separate
sub-meshes, one for each side. 
Try adjusting Sensitivity to achieve the desired design
intent.
If you are unable to separate the areas to
match your design intent, you need to do manual painting. In this example,
you need to do manual painting.
Click Apply
to create the sub-meshes.
Under Manual
Painting, select a color depending on your goal, and a paint tool.
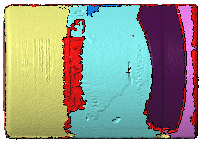
In this example, you first need to use the Paint brush  to paint the edges red
to separate the blue sub-meshes.
to paint the edges red
to separate the blue sub-meshes.
|

|

|
|
Edge before using Paint
brush |
Edge after using Paint
brush |
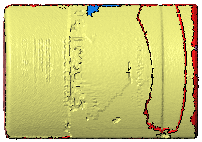
Use the Paint
can  to paint the sub-meshes as one color,
other than blue, which was used on the other face.
to paint the sub-meshes as one color,
other than blue, which was used on the other face.
|
|
|
|
Side before using Paint
can |
Side after using Paint
Can |
Clean up any remaining sub-meshes to achieve the
design intent. In this example, you use the Paint
brush again.
Click  .
.