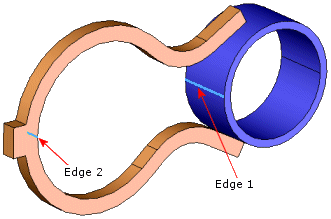
You apply a prescribed displacement of 2.678" so that Edge 1 of the pipe (see the figure below) touches Edge 2 of the holder.
-
In the SOLIDWORKS Simulation study tree, right-click the Fixtures
 folder and select Advanced Fixtures.
-
In the PropertyManager, under Advanced (Use Reference Geometry), do the following:
- Make sure Use Reference Geometry is selected from the menu.
- Click inside the Face, Edge, Plane, Axis for Direction box
 and click the Front Plane from the flyout FeatureManager design tree.
Front Plane is used to specify the direction of the prescribed displacement.
-
Click inside the Faces,
Edges, Vertices for Fixture box
 , then click Edge 1 of the pipe in the graphics area.
-
Under Translations, do the following:
- Set Unit
 to in.
- Click Along Plane Dir 1
 , then type -2.678 in the value box.
The negative sign indicates that the prescribed displacement is applied in the negative direction of Dir 1 of Front Plane.
-
Under Variation with
Time, make sure that Linear is selected.
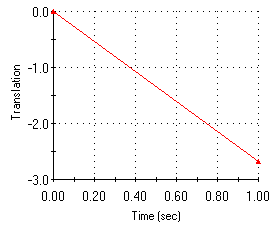
The program applies the prescribed displacement in
increments determined by autostepping. The prescribed displacement-time
curve is linear. It starts with a zero displacement at time zero and reaches
its full value (-2.678 inches) at the end of solution period. To view the
actual displacement-time curve, click
View.
-
Click
 .
.