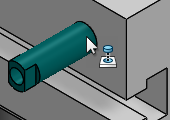
Dragging the Pillar into the Assembly In the FeatureManager design tree of the pillar document, select Extrude2, the feature with the cylindrical face that you want to mate. Drag the feature name into the assembly document and over the hole. The pointer changes to . This pointer indicates that if the pillar is dropped at this location, a concentric mate and a coincident mate are created. A preview snaps into place. Press Tab several times to see how you can change the alignment (aligned/anti-aligned). Drop the pillar. Repeat steps 1-4 to add a pillar to the hole at the other end of the table. Close pillar.sldprt and maximize the assembly window. Parent topicAssembly Mates Previous topic Using SmartMates Next topic Using File Explorer to Add Components