To open the PropertyManager:
- Insert or select a Model View, a Predefined View, or an Empty View in a drawing.
- Drag a model with annotation views into a drawing.
The properties available depend on the type of view you select.
Part/Assembly to Insert
Select a document from Open documents or click Browse.
Thumbnail Preview
View a preview of the model selected in Open documents.
Options
| Start command when creating new drawing. |
Available when inserting a model into a new drawing. The Model View PropertyManager appears whenever you create a new drawing except if you click Make Drawing from Part/Assembly  . .
|
| Auto-start projected view |
Allows you to insert projected views of the model after you insert the model view.
|
Import Options
| Import annotations |
Select Import annotations to all selected types of annotations to be imported from referenced part or assembly documents.
Select annotation import options:
- Design annotations
- DimXpert annotations
- Include items from hidden features
|
Reference Configuration
Options
 |
Configuration name |
Lets you change drawing view configurations.
|
| |
Select Bodies |
Lets you select the bodies of a multibody part for inclusion in the drawing view. For flat patterns of multibody sheet metal parts, you can use one body per view.
|
| |
Show in exploded or model break state |
In assemblies and multibody parts that contain an exploded or model break view, select to display a drawing view in the exploded or model break state.
|
Rename Configuration
For sheet metal flat patterns only.
| New name |
You can edit the flat pattern configuration name (which appears underneath the model configuration name in the model ConfigurationManager) that appears in the box.
|
| Update |
Click to update the configuration name in the Model View PropertyManager and in the model ConfigurationManager.
|
Orientation
| |
Create multiple views |
Lets you select more than one view to insert.
|
| |
View orientation |
Displays standard view orientations of the model:
 Top Top  Front Front  Right Right  Left Left  Bottom Bottom  Back Back  Isometric Isometric
|
| |
Annotation view |
Displays annotation views if they were created in the model.
|
 |
More views |
Displays additional views such as Current Model View (if the model is currently open), *Trimetric, and *Dimetric.
|
| |
Preview |
(Available when Create multiple views is cleared). Shows a preview of the model while inserting a view.
|
Mirror
| |
Mirror view |
Displays model, relative to model, and predefined drawing views as mirror views without creating the mirror components. Select Horizontal or Vertical. For example,
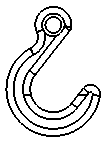 |
| Original view |
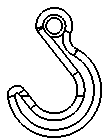 |
| Mirror view - Horizontal |
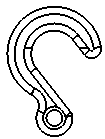 |
| Mirror view - Vertical |
|
Crop View
For crop views only.
| No outline |
Select to remove outline of closed sketch used to create crop view.
 |
 |
| Selected |
Cleared |
|
| Jagged outline |
Select to include a jagged outline of the crop view.
Move the slider to adjust Shape Intensity.
 |
| Selected |
|
Display State
For assemblies only. Select a display state of the assembly to place in the drawing.
The
hide/show 
display state is supported by all display styles. Other display states (
display mode 
,
color 
, etc.) are supported by
Shaded with Edges 
and
Shaded modes 
only.
Flat Pattern Display
For sheet metal flat patterns only.
 |
Angle |
Lets you display the drawing view at a specific angle.
|
| |
Flip view |
Flips the view horizontally.
|
Insert Model
For Predefined Views only. Select a model from the list under Part/Assembly of models open in the SOLIDWORKS session or existing in the drawing, or click Browse and browse to a model file.
Display Style
Available only if Display quality for new views is set to Draft quality. Select High quality or Draft quality to set the display quality of the model.
Broken-out Section
For drawing views that include broken-out section views only.
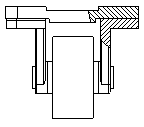
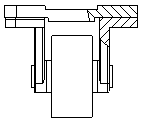
| Scale hatch pattern |
Applies the view's scale to hatches within the broken-out section view.
 |
 |
| Selected |
Cleared |
|
Scale
Select a scale for the drawing view.
Cosmetic Thread Display
The following settings override the Cosmetic thread display option in .
| High quality |
Displays precise line fonts and trimming in cosmetic threads. If a cosmetic thread is only partially visible, High quality shows only the visible portion (it shows precisely what is visible and what is invisible.)
System performance is slower with High quality cosmetic threads. It is recommended that you clear this option until you finish placing all annotations.
|
| Draft quality |
Displays cosmetic threads with less detail. If a cosmetic thread is only partially visible, Draft quality shows the entire feature.
|
Save View As
Expand
Save View As to save a drawing view as a
Dxf or
Dwg file. Optionally, drag the point manipulator

to set the origin in the file and click
Save View As DXF/DWG 
. Set the options in the
Save As dialog box.
Export only model geometry ignores other sketch annotations that are associated with the selected view.