Now add end caps to close the open ends of the segments of the back structural member.
-
Click End Cap
 (Weldments toolbar).
- In the PropertyManager, click
 .
.
- Under Parameters:
-
Select the two upper faces in the back corners for
Face
 .
Zoom into the corners as necessary.
-
Set Thickness
direction to Inward
 to make the end cap flush with the original extent of the structure.
-
Set Thickness
 to 3.
to 3.
- Under Offset, select Thickness Ratio and set Thickness Ratio to 0.5.
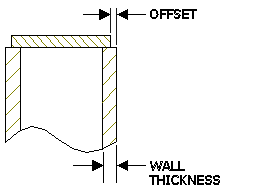
The end cap offset is the distance from the edge of the structural member to the edge of the end cap.

You can specify an Offset Value, or you can specify a Thickness Ratio value between 0 and 1. Then the offset is equal to the wall thickness of the structural member multiplied by the specified thickness ratio.
- Click Corner Treatment.
- Select Chamfer and set Chamfer Distance
 to 3.
to 3.
- Click
 .
.
- Repeat steps 3 through 7 to cap the two lower faces in the back corner.
- Click
 to close the PropertyManager.
In the FeatureManager design tree,
End
cap1 and
End cap2 appear.
The
Cut list

is incremented and the end
caps are listed in the
Cut-List-Item9(4) folder.