Next trim the upper-left and lower-right side segments where they intersect with the back structural member. You trimmed the other two corners when you applied corner treatments.
-
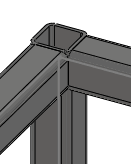
Zoom to the upper left corner.
- In the graphics area, select the horizontal tubes for Bodies to be Trimmed.
-
Under
Trimming
Boundary, select Face /
plane and click in Face/Bodies. Then, in the graphics area, select the faces of
the vertical member, as shown.
-
Click
 .
.
The vertical member extends to the lower faces of the
horizontal members.
-
Extend the vertical member to the top of the horizontal members:
- In the graphics area, select the vertical member for Bodies to be Trimmed.
- Select Allow extension.
- Under Trimming Boundary, select Face / plane and click in Face/Bodies. Then, in the graphics area, select the top face of one horizontal member, as shown.
-
Click
.
The vertical member is trimmed flush with the
face of the top member.
- Repeat steps 2 through 5 to trim the lower-right corner. Rotate the model for access to the correct faces.
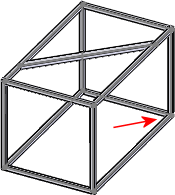
The four side segments are already trimmed to the front group, so you have finished trimming the model.
- Click
 to close the PropertyManager.
-
Click Trimetric
 (Standard Views toolbar).
-
Click .