Add fillet weld beads between the gussets and Structural Member1.
-
Zoom to the bottom left corner of the front group.
-
Click Fillet Bead
 (Weldments toolbar).
- In the PropertyManager, click
 .
.
- Under Arrow Side:
- Select Full length for Bead type.
-
Under Fillet
size, set Bead
size
 to 3.
to 3.
-
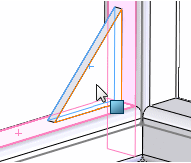
Select the gusset face shown for Face set 1
 .
.
-
Click in Face set
2
,
then select the two flat faces of the structural member, as shown.
- Select Other Side:
-
Use the same Bead
type and Fillet
size
as in Arrow Side.
-
Rotate the part, then select the gusset face shown for
Face set 1
.
You can rotate the view
about a selected edge. Click
Rotate
View

(View toolbar),
click the vertical edge of the gusset, then drag to rotate the view.
-
Click in Face set
2
,
then select the same two flat faces as in Arrow Side.
-
Click
 .
.
The fillet weld beads and annotation appear.
If the annotation is not visible, rotate the part back
to its original orientation.
- Repeat steps 4 through 6 to apply fillet weld beads to the remaining three gussets.
- Click
 to close the PropertyManager.
In the FeatureManager design tree,
Fillet Bead1 through
Fillet Bead4 appear and
Cut list 
is incremented.
Unlike the end caps and gussets, the fillet beads are not listed in a separate cut-list-item folder, but they are displayed in the
Cut list .
-
Click .