Creating a Base Flange

A base flange is the first feature in a new sheet metal part.

When you add a base flange feature to a SOLIDWORKS part, the part is marked as a sheet metal part. Bends are added wherever appropriate, and sheet metal specific features are added to the FeatureManager design tree.

The Base Flange feature is created from a sketch. The sketch can be any of the following contours:
Single Open Single open contours can be used for extrudes, revolves, sections, paths, guides, and sheet metal. Typical open contours are sketched with lines or other sketch entities.
Splines are invalid sketch entities for sheet metal parts with open contours.

sketch_contour_open.gifsketch_contour_open2.gif

Single Closed Single closed contours can be used for extrudes, revolves, sections, paths, guides, and sheet metal. Typical closed contours are sketched with circles, squares, closed splines, and other closed geometric shapes.
Multiple Contained Closed Multiple contained closed contours can be used for extrudes, revolves, and sheet metal. If there is more than one contour, one contour must contain the rest. Using the Contour Select pointer_contour_select.gif in the PropertyManager, you can select one or more contours to convert into features.
Typical multiple contained closed contours are sketched with circles, rectangles, and other closed geometric shapes.
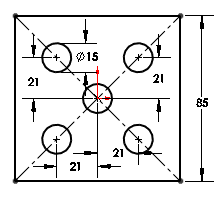
sketch_contour_multiple.gif
Multiple contained closed contours can also be disjointed. Typical multiple disjoint closed contours are sketched with circles, rectangles, and other closed geometric shapes.
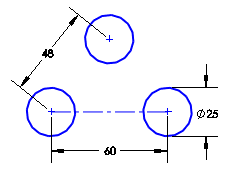
sketch_contour_disjoint.gif

The thickness and bend radius of the Base Flange feature become the default values for the other sheet metal features.

To create a Base Flange feature:

  1. Create a sketch that meets the requirements above. Alternatively, you can select the Base Flange feature before you create a sketch (but after you select a plane). When you select the Base Flange feature, a sketch opens on the plane.
    base_flange_sketch.png
  2. Click Base Flange/Tab Tool_Base_Flange_Tab_Sheet_Metal.gif on the Sheet Metal toolbar, or click Insert > Sheet Metal > Base Flange.
    base_flange_preview.png
    The controls on the Base Flange PropertyManager update according to your sketch. For example, the Direction 1 and Direction 2 boxes do not appear for a sketch with a single closed profile.
  3. If necessary, under Direction 1 and Direction 2, set the parameters for the End Condition and Depth PM_distance1.gif.
    Some fields that accept numeric input allow you to create an equation by entering = ( equal sign) and selecting global variables, functions, and file properties from a drop-down list. See Direct Input of Equations.
  4. Under Sheet Metal Gauges, select Use gauge table and select a gauge table.
  5. Under Sheet Metal Parameters:
    1. Set a value for Thickness PM_thickness.gif to specify the sheet metal thickness.
    2. Select Reverse direction to thicken the sketch in the opposite direction.
    3. Set a value for Bend Radius PM_fillet_radius.gif.
  6. Under Bend Allowance, select a bend allowance type.
    1. If you selected K-Factor, Bend Allowance, or Bend Deduction, enter a value.
    2. If you selected Bend Table or Bend Calculation, select a table from the list, or click Browse to browse to a table.
  7. Under Auto Relief, select a relief type. If you selected Rectangular or Obround, do one of the following:
    • Select Use relief ratio and set a value for Ratio.
    • Clear Use relief ratio and set a value for Relief Width dim_lin_horiz_w.png and Relief Depth dim_lin_vert_d.png.
  8. Click PM_OK.gif.
    base_flange_done.png