SOLIDWORKS Electrical 3D
- Exercise #03
This exercise allows you to manipulate the content of the 2D file created
from the 3D layout. It is based on the previous one, if you did not complete
the Exercise #02, you can download
the electrical project file. Unarchive
it in SOLIDWORKS Electrical.
Creating 2D
views and inserting into drawings
Creating Project Drawing
Creating
2D views and inserting into a 2D file
Generate the 2D views, incorporating the following elements:
|

|
Drilling
table |
List of
components |
|
Component
report |
1. The command to generate the file to create
a drawing is available in the SOLIDWORKS Electrical
tab in the Ribbons menu.

|
SOLIDWORKS Electrical
3D menu: Create 2D drawing |
SOLIDWORKS Electrical
creates an empty draft file, using the dimensions of the title
block settings in the electrical project configuration. |

2. Insert the front view.
SOLIDWORKS Electrical
uses SOLIDWORKS commands to build the draft. The right dockable
panel displays an additional tab showing all the available views. |
3. Select the front view and insert it in
the draft sheet and cancel the supplementary views.
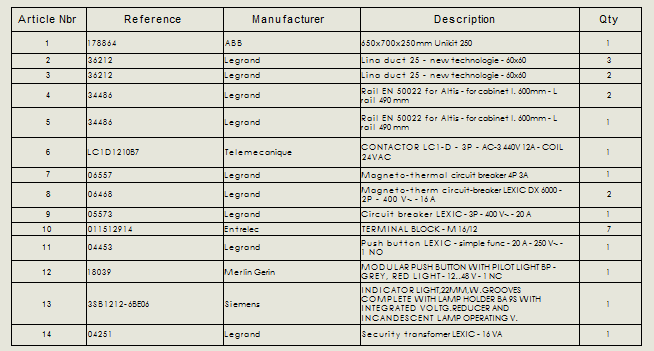
4. Insert the bill of materials.
The bill of materials used in the draft is the BOM managed
by SOLIDWORKS. It is a bill of parts and not an equipment report,
such as one might have under SOLIDWORKS Electrical Schematic.
The command to insert a bill of materials is available in the
menu: Insert > Tables >
Bill of Materials.
Select the front view. In the left dockable panel, select Bom-standard as the template
bill of materials. The settings will not be changed. |
5. Modify the bill of material from the model.
As mentioned earlier in this chapter, SOLIDWORKS Electrical
uses the SOLIDWORKS bill of materials. This is mainly done to
meet mechanical drawing requirements. It now needs to be adapted.
Delete the Material
column. Using the column property edit commands, modify the Part number column and display
the manufacturer part in its place and add the Manufacturer
column. |
6. Insert item number balloons into the front view.
Select the AutoBalloons
command in the Annotation
tab in the Ribbons menu. In the insertion settings, check the
Ignore multiple instances
box. In the front view properties, ensure that the balloons are
correctly linked to the bill of materials. |
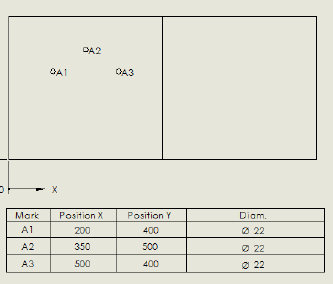
7. Insert the hole table view.
Insert the back view and select it to edit its properties.
To fill in the hole table correctly, you must hide the door components.
In the properties of the view, click on the More
properties button. Select the Hide/Show
components tab, then click on the three door components
to add them to the selection.
The command to insert the hole table is available in the menu:
Insert > Tables > Hole
Table. Select the angle (bottom left corner
of the door) to define the origin of the dimensions. Then select
the three holes.
Validate and insert the table in the graphical area. |
Creating Project Drawing
1. Generate the SOLIDWORKS Electrical 2D
drawing from SOLIDWORKS 2D file previously realized.

|
SOLIDWORKS
Electrical Drawing menu: Create Project Drawing |
The drawing is automatically added to the electrical project. |