You define two sets of spot welds to connect the roof to the side shells. For your convenience, two sets of reference points have been created to be used in the definition of spot welds.
To define spot weld connectors between the roof and side faces:
-
Right-click the Connections
 folder and select Spot Welds.
-
In the PropertyManager, under Type:
- Select the face of one of the side shells as shown for Spot Weld First Face
 .
.
- Select the face of the roof for Spot Weld Second Face .
-
Click inside the Spot Weld Locations box then do the following:
- Expand the Locations for Spot Weld 1 folder in the flyout FeatureManager design tree.
- Select all the points in the folder.
The selected reference points appear in
Spot Weld Locations 
.
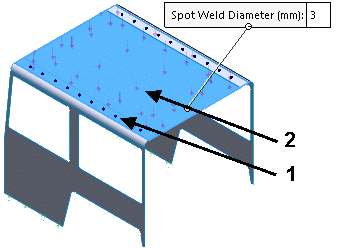
- Select mm from the units menu then type 3 for Spot Weld Diameter
 .
.
-
Click
 then click
  to add a spot weld connector and leave the PropertyManager open.
- A warning message informs you that the current gap between the spot weld faces is greater than 3 mm. Click Yes to continue.
The program allows you to add spot weld connectors between source and target surfaces with distance between 3 mm to 20 mm. Spot weld electrode diameters range from 3 mm to 13 mm.
The software connects the selected two shells via spot welds at the specified reference points and clears all selection boxes to allow you to define more spot weld connectors.
-
Define a second set of spot weld connectors to connect the other side of the car and the roof as shown below.
Use the points in the
Locations for Spot Weld 2 folder as spot weld locations for this set. All spot welds have the same diameter (3 mm).
-
Click
 then click .
- If a dialog box containing a warning message appears, click Yes to continue.