SOLIDWORKS Electrical Schematic
- Exercise #04
This exercise will allow you to know the basic commands managing the
electrical schema. It is based on the electrical project you made in the
Exercise #03. If you did not complete
it, you can download the electrical project file and unarchive
it in SOLIDWORKS Electrical.
To do this exercise you need to download the PDF file of the exercise.
Printing it out is recommended.
Inserting wires
Create the scheme 03.
(Appendix 4a) |
Inserting power wires
Start by placing the wires, using
the placement options to manage bends. |

|
Menu: Schematic > Draw
multiple wires |
1. If the current wire is not N
L1 L2 L3, click on the [?]
button to open the wire selector and
select it.
2. Uncheck the box for the protection conductor.
3. Click the two points of the horizontal wire corresponding
to the busbar.
4. To draw the motor circuit wires, carry out the
same operation as before, unchecking the Neutral
box. For the first click, place the cursor on L3.
Use the [C] key to insert the
bend and the [Space] key to cross
or uncross the conductors.
5. To draw the wire upstream of the transformer, do
not try to disconnect the phase on L2
directly. First, connect it to L1,
then select and disconnect it from L1
using the handle (blue square). Finally, reconnect it to L2.
Inserting control-command wires
The wire type downstream of the
transformer is 48VDC. |

|
Menu: Schematic > Draw
single wire type |
Remember click on the [?]
button in the dockable panel to open the wire selector and select
wire = 48V. |

Inserting symbols
Graphics model to be produced,
see Appendix 4A. |
Place the symbols using either the library or the palette.
The quickest and easiest way
to insert symbols is to use the palette.
Even if this seems time-consuming to start with, once you create
your own palette, draws and (especially) searches will go much
faster. |
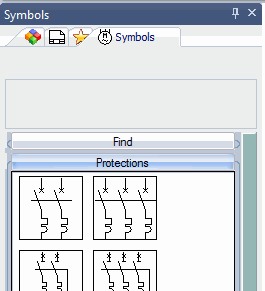
1. Open the Symbols
tab in the dockable panel.

2. Click on the Protections
group header. If the symbol for the three-pole circuit breaker is not
there, add it by opening the group?s contextual menu. If it is in the
palette, double-click to insert it.
3. You can also use the palette and the Search
group. Enter Circuit breaker in
the input box and click on the Search
button. SOLIDWORKS Electrical
displays the thumbnails of all the symbols in the library that meet the
criteria, not only the symbols in the palette.

|
Menu: Schematic > Insert
symbol |
1. If the symbol you want is not shown in the dockable
panel, click on the Other symbol
button.
2. The symbol selector
opens. Use one of the two tabs (Filters or Classification) to find the
desired symbol.
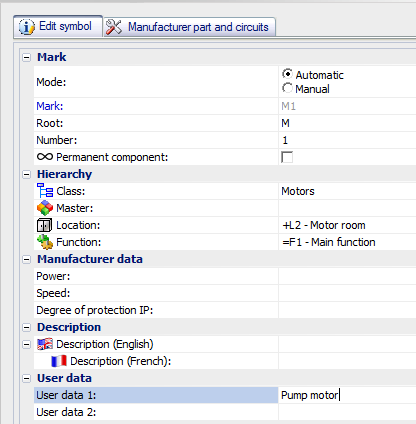
Associate the M1 motor with the symbol placed in the line diagram.
Add the Pump motor text.
To associate the M1 motor with
the symbol in the line diagram drawing, simply give it the same
mark. |
1. In the mark dialog box, select the M1
mark from the list of components on the right and click on OK.
The manufacturer data is provided
by the manufacturer part. The user data is entered by the user.
This data can be propagated across
the symbol as long as the associated attribute is present in the
definition of the symbol. |

Fuse F3 is a copy of F2.
1. The Copy
command is available in the Schematic
menu.

|
Menu:
Schematic > Multiple copy |
The mark is automatically incremented
when copying an existing symbol. The manufacturer part associated
with the original symbol is also copied. |
Use the placement options to insert F4 and the K1 contact.
When a symbol is inserted on a wire, it is automatically
oriented according to the wire. When it is inserted outside the
wire, it is up to the user to manage orientation.
Note the automatic generation of the cross references. |
Complete the F4 wires and the auto-supply wires for K1.
Graphics model to be produced,
see Appendix 4B. |

Assigning
manufacturer parts
Allocate the manufacturer parts, using the equipment report to help
you (Appendix 4C).
1. Open the component properties.

|
Contextual menu of a symbol: Component
properties |
2. Go into the Manufacturer
part and circuits tab.
3. Click on the Search
button to search
for the part in the manufacturer catalog.
- Select the class.
- Select the manufacturer.
- If you know the reference, enter it in
the Reference field.
- If you have not checked the Automatic
refresh box, click on the Search
button.
- Select the part from the list of results.
- Click on the [+]
button to add it.
To add an auxiliary reference
(such as a contacts block), repeat the operation, selecting Auxiliary in the Type
field.
Sometimes, it's necessary to uncheck
the Class criteria to
find an auxiliary or an accessory. They can be stored in another
class (common to several references). |
