Next, you insert plug connectors from the Design Library into the
assembly.
You can
find a collection of prespecified routing components in the Routing Library. You
can add components to existing folders in the Routing Library, or create new
folders.
-
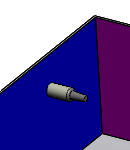
Click Rotate View
 (View toolbar) and rotate the assembly to view the
holes in the blue inside
wall.
(View toolbar) and rotate the assembly to view the
holes in the blue inside
wall.
-
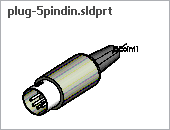
In the Design Library
 , click , and select plug-5pindin.SLDPRT.
After adding Routing to SOLIDWORKS, you should have access to the
electrical folder in the Routing
Library under the Design Library. See your administrator if you do not
have access to the Routing Library.
To specify the Routing Library file locations, click .
- Drag the plug into the assembly and mate it with the right-most hole on the blue side.
Routing Library parts contain mate references that facilitate
mating of components to assembly features. A plug from the Routing Library
appears to mate to a hole in the assembly wall as you drag it near a hole to
which it can mate.
The connector mates with the housing when you release the
mouse. The mates appear in the Mates
folder of the harness subassembly.
Click
Yes if
prompted to set options for routing, and click

to close the
Route Properties PropertyManager if it appears.
A new
subassembly for the route harness opens in 3D sketch mode. Assembly colors
appear gray in 3D sketch mode.The
Auto Route PropertyManager appears.
-
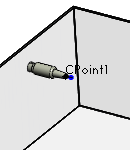
Click Rotate View
(View toolbar) and rotate the assembly to view the
six holes opposite the plug.
-
Drag another plug-5pindin.SLDPRT
into the assembly and mate it with the lower middle hole on the side opposite
the first plug.