The names of components listed in the Insert
Component PropertyManager are derived from the imported from-to list. Next,
you insert the listed components and complete the route specified by the from-to
list.
-
Click Rotate
 (View
toolbar) and Zoom to Fit
(View
toolbar) and Zoom to Fit
 (View toolbar) for access
to the short side of the assembly with six
holes.
(View toolbar) for access
to the short side of the assembly with six
holes.
-
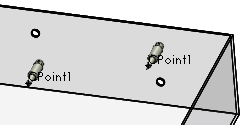
Insert
battery1
in the
upper-right
hole and motor1 in the lower middle hole
as shown.
When you mate a connector, it is removed from the
Insert route connectors list
in the PropertyManager.
-
Insert xcon1, xcon2, and xcon3 from left to right in the opposite wall of the assembly.
-
Click Yes when prompted
to start the route.
-
Click
 to
close the Route Properties
PropertyManager.
to
close the Route Properties
PropertyManager.
The Auto Route
PropertyManager appears.