Balloons
You can create balloons in a drawing document or in a note.
The balloons label the parts in the assembly and relate them to item numbers
on the bill of materials (BOM).
However, you do not have to insert a BOM in order to add balloons. If
the drawing has no BOM, the item numbers are the default values that the
software would use if you did insert a BOM. If there is no BOM on the
active sheet, but there is a BOM on another sheet, you can use the numbers
from that BOM if you select a BOM under Link
balloon text to specified table in the Drawing View Properties
dialog box.
To set the default BOM balloon properties, click Tools, Options,
Document Properties, Annotations,
Balloons.
If the default BOM balloon Style
is Circular Split Line, you can
choose what type of text to display in both the Upper
and Lower portions of the balloon.
For other styles, only Upper is
available. Type of text can be Text,
Item Number, Quantity,
or Custom Properties. If you set
a custom property, it automatically appears in the Balloon
PropertyManager.
|
|
|
|
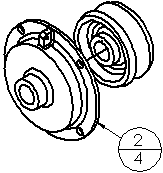
Circular Split Line
balloon |
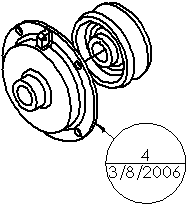
Balloon with Custom Properties |
Balloons are automatically suppressed
when the components they reference are suppressed.
Balloons display an asterisk
(*) if:
You can also add balloons in
assembly documents. To import balloons from an assembly document into
a drawing view, click Notes in
the Model
Items PropertyManager.
You can attach balloons to sketch entities. This is useful when sketches
(with no extrusions) are combined to form an assembly and then taken into
a drawing.
If you change the Item Number
in a balloon, the item number in the bill of materials also changes.
 To change an
Item Number in a balloon that
is associated with a table-based BOM, clear Do
not change item numbers
To change an
Item Number in a balloon that
is associated with a table-based BOM, clear Do
not change item numbers  in the Bill
of Materials PropertyManager. To return to assembly order after changing
item numbers, click Follow assembly order
in the Bill
of Materials PropertyManager. To return to assembly order after changing
item numbers, click Follow assembly order
 .
.
To change an Item Number in a balloon that is associated
with an Excel-based BOM, you must clear the Row
numbers follow assembly ordering check box on the Control
tab of the Bill of Materials Properties
dialog box. If the check box is selected (default), a message appears
stating that the item number cannot be changed.
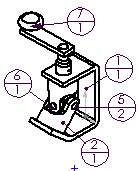
You can also create stacked balloons. See Stacked Balloons.
To insert balloons:
-
Click Balloon  on the Annotation toolbar, or click Insert, Annotations,
Balloon.
on the Annotation toolbar, or click Insert, Annotations,
Balloon.
The Balloon
PropertyManager appears.
Edit the properties in the PropertyManager as
needed, then click a component in a drawing view of an assembly, or click
a component in an assembly model, to place the leader, then click again
to place the balloon.
When you insert balloons, you must hover over the entity
to highlight the entity and to attach the leader. The leader does not
appear until you hover over the entity. This way, the leader and highlighted
entities do not hinder your view of the model or drawing view. 
A balloon containing an item number attaches
to the part. If you specified the text to be Item
Number, the number in the balloon corresponds to the item number
in the bill of materials.
Continue inserting as many balloons as needed.
Edit the properties for each balloon in the PropertyManager before inserting
the balloon.
-
Click OK  .
.
To move the balloon or leader arrow, select and drag the balloon,
or drag the leader by the handle.
To change the balloon properties:
Select the balloon and edit the properties in the Balloon
PropertyManager.
- or -
Right-click the balloon and select Properties.
Make changes in the Note
PropertyManager and click OK.
To edit balloon text:
Double-click the balloon text and edit in place.
To add multiple leaders to a balloon:
You can add more leaders to an existing balloon
by holding down Ctrl and dragging
a leader attachment point.