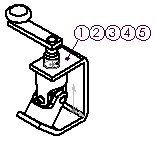
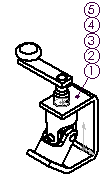
Stacked Balloons
Stacked balloons combine multiple balloons on a single leader. The balloons
are stacked each time you select a component. You can stack the balloons
vertically or horizontally. You can insert stacked balloons in drawings
of assemblies and in assembly documents.
To import balloons from an assembly document into a drawing view, select
Notes in the Model
Items PropertyManager.
To set default stacked balloon properties, open Document Properties - Balloons.
Under Stacked balloons, set Style and Size.
Under Text, choose the balloon
contents: Text, Item
Number, Quantity, or Custom Properties. You can override
these settings in the PropertyManager.
You can insert a stacked balloon without selecting a component, so you
can annotate an item that is part of an assembly but not actually modeled,
such as glue or a liquid.
|
 Balloons display an asterisk (*) if: Balloons display an asterisk (*) if:
- or -
|
If you change the Item Number
in a stacked balloon, the item number in the bill of materials also changes.
 To change an
Item Number in a table-based BOM,
clear Do not change item numbers
 in the Bill
of Materials PropertyManager. To return to assembly order after changing
item numbers, click Follow assembly order
 .
.
To change an
Item Number in an Excel-based BOM, you must clear the Row
numbers follow assembly ordering check box on the Control
tab of the Bill of Materials Properties
dialog box. If the check box is selected (default), a message appears
stating that the item number cannot be changed.
To insert stacked balloons:
-
Click Insert,
Annotations, Stacked Balloon  .
.
The Stacked
Balloon PropertyManager appears, and the pointer changes to
 .
.
Select the point on the component where you want
the balloon leader attached, then click again to place the first balloon.
(The order in which you select the components determines the order in
which the balloons are stacked.)
 When you insert stacked balloons, you must hover over the
entity to highlight the entity and to attach the leader. The leader does
not appear until you hover over the entity. This way, the leader and highlighted
entities do not hinder your view of the model or drawing view.
The leader and the first balloon appear.
-
Continue to select components.
A balloon is added to the stack for each component selected. As
you add the stacked balloons, you can select the stack direction in the
PropertyManager (Up  ,
Down
  , Left
 , Right
  ).
).
Each balloon is a separate note that you can select to delete or
edit.
Click OK
 to close the PropertyManager.
To add balloons to the stack later:
Right-click one of the stacked balloons and select
Add to Stack.
Select
additional components to add to the stack.
To remove
balloons from the stack:
Select a balloon in the stack
and press Delete.

To edit balloon text:
Do one of the following:
Double-click the balloon text and edit in place.
Select the balloon and edit the text in the PropertyManager.
Right-click the balloon, select Properties.
To change the properties of the stacked
balloons:
Do one of the following
Select a balloon or balloons in the stack
and change properties in the PropertyManager. For additional properties,
click More Properties to access
the Note
PropertyManager.
-
Right-click a balloon and click Properties.
 Changes to properties apply only to selected balloons. To
change all balloons in the stack, select all of them.
|
Balloons stacked Right |
Balloons stacked Up |
|

|

|